
Assuming you have Cedalion installed, and managed to run Eclipse, this page describes the process of setting up Cedalion up to the point you can start dreaming up languages.
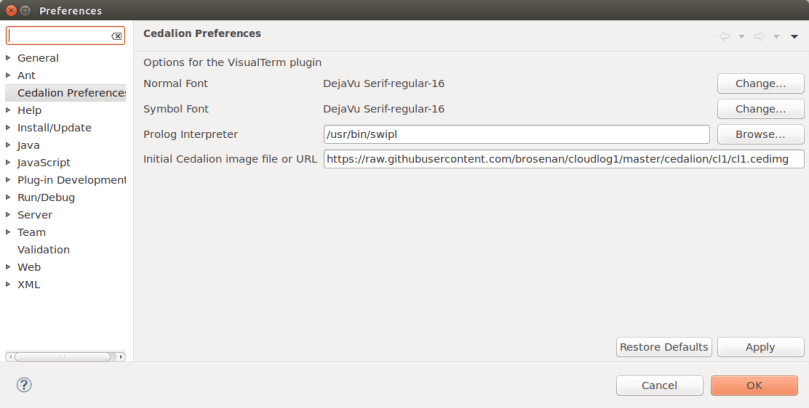
Cedalion Preferences
From the main menu, choose Window/Preferences, and select Cedalion Preferences from the left-hand pane.
Native Installation
Users who chose the native installation should perform the following:
- Select normal and symbol fonts. It is important that the symbol font shall have a good coverage of Unicode.
- Under “Prolog Interpreter” enter the path to the swipl executable on your system. You can use the “Browse” button for that.
All Installations: Base Cedalion Image
Regardless of installation, you need to set up an Initial Cedalion Image file or URL. A Cedalion image is a file containing a complete Cedalion program. By setting up a URL to such an image you import all the work done elsewhere, and all projects in this workspace can depend on this work.
- The minimal image is the bootstrap image: https://raw.githubusercontent.com/brosenan/cedalion/master/bootstrap.cedimg
- The most feature-rich image is the cloudlog1 image: https://raw.githubusercontent.com/brosenan/cloudlog1/master/cedalion/cl1/cl1.cedimg
The latter is designed especially for implementing Web applications, and contains the Cloudlog language as a DSL, but it also contains “goodies” such as BDD support.
Just copy one of these to the Cedalion Image field.
Restart Eclipse
After setting up preferences, choose File/Restart from the main menu. This will restart Eclipse, and force the Cedalion plug-in to read the image from the URL.
It is also important to restart Eclipse after importing a project to the workspace or after removing files. The Cedalion plug-in loads the files in the workspace only when starting. It does not identify situations when a file is added or removed.
Restarting Eclipse is also important when the Cedalion Workbench (the editor) starts to slow down. This slowdown is a result of a resource leak, and can be solved with a restart.
Bottom line, if you did anything out of the ordinary or the Cedalion Workbench is acting strange — File/Restart.
